Soil sample collection and preparation for analysis
Minerals elements are very important for plant growth. In this 16 elements are very important they are nitrogen, phosphorous and potash act as major elements. Calcium, magnesium and sulfur are the secondary nutrients. Iron, manganese, zinc, copper, boron molybdenum chlorine and nickel are the micro nutrients.
For the agricultural purpose these elements are very important. So primarily we have to check the quantities of these elements. So we have to conduct soil testing. Then only we can analyse the quality of soil
Major soil analysis steps takes place in laboratory, but soil sampling that means sample collection from the field is also very important. If we not collect the sample properly whatever we analyse in laboratory will not get the appropriate results. So we have to follow proper procedure of soil sampling
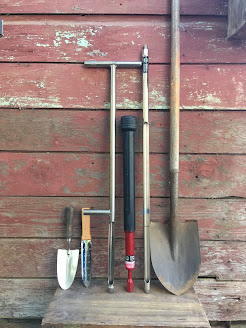
Soil sample collection some of the tools and accessories is required they are
Soil auger – it may be a tube, post-hole or screw-type auger
or even a spade for taking sample;
clean bucket or a tray or a clean cloth –
for mixing the soil and sub sampling
Cloth bags of a specific size
Copying pencil for markings, and tags for tying cloth bags;
Soil sample information sheet.
Soil sampling procedure
Before collecting the soil samples first we have to survey the field and collect some data like color of the soil, texture of the soil, management and varieties crops in the field.
When we are collecting the soil sample, soil color and texture are similar we have to consider as one unit and 1 or 2 hectare consider as one unit it should not exceed
Best time for soil sample collection is at the time of sowing or planting
At list 8 to 10 random places pointed out in the field and collect the soil sample at that point.it is shown in the figure.
At the time of sampling, type of crop is also very important this table gives the information about type of crop collection depth and place of the sample
|
Sl.no |
Type of crops |
depth |
Place |
|
1 |
Vegetables, fruits, flowers, medicinal plants and agricultural crops |
1.00 ft |
Between the two lines |
|
2 |
Small trees some plantation crops |
2.00 ft |
Perimeter of the tree |
|
3 |
Large trees and some plantation crops like horticultural crops |
3.00 ft |
Between the two trees or away from 4 to 6 ft |
Make V shaped cut like above the preferred
place and depth, take a slice of 2 cm on one side of the cut and take it in a
bucket.
Take soil from a minimum of 10 random locations to make a composite sample
After this properly mix the soil sample.
Take a clean cloth and spread it like a circle
Make a plus mark on it and remove the soil present in opposite blocks (b and c)
Follow this procedure for one to two times to reduce the sample size
The sample atlest have 1 kg. and transfer to a clean bag
Sample should have a label describing field identification, farmer’s name and address, previous crops, and nutrient recommendation is required for which crop
After this send it to the laboratory for the analysis.
After the sample reaches in the laboratory or processing room it has to be dried, ground and sieved
Otherwise after collecting 1 kg of soil sample shade dried it, grind it and sieve it in 2mm mesh sieve and transfer to clean bag then send to the laboratory.
Some of the important points we have to follow
When we are collecting the soil sample we should not take it from the border, the place where the water stops, immediate after applying the fertilizer, immediate after watering or after rain. Rainy season is not suitable for sample collection


If this information is useful, please spread it by sharing this page.
ReplyDeleteVery useful information
Delete